
Here is an essential guide to wiring your van’s electrical system:
Resources and links you need to know
Are you ready to embark on your van conversion journey and add electrical systems to your cozy home on wheels? In today’s guide, we’ll take you through the process of running wires in your van. It may sound daunting, but we’re here to make it easy and straightforward, so don’t worry. We’ve got you covered.
Tools You’ll Need:
- Wire Cutters (e.g., Pittsburgh wire cutters with a lifetime warranty)
- Electrical Tape
- Sharpie Marker
- Various Gauges of Stranded Copper Wire (12 AWG, 14 AWG, and 16 AWG)
Before we start, it’s essential to understand that the gauge of the wire (measured in AWG) determines its thickness and capacity to carry electrical current. Choosing the right wire gauge ensures your electrical devices operate safely and efficiently.
Let’s Begin:
1. 16 AWG Wire for LED Lighting: Start with 16 AWG wire, perfect for LED lighting and small, low-draw accessories. It’s ideal for lighting that doesn’t require a switch. Run this wire through your van’s ceiling to where your lights will be installed. Leave ample slack and mark it with a label such as “Ceiling Lights.”
2. 12 AWG Wire for a Fridge: For a 12-volt fridge, use a thicker 12 AWG wire to handle the increased power requirements. Ensure your wire has sufficient slack, and run it to the location of your fridge, marking it accordingly.

3. 12 or 14 AWG Wire for Fans: Ceiling fans or roof fans can be powered with either 12 AWG or 14 AWG wire, depending on the specific requirements. Run these wires to the respective fan locations, ensuring ample slack and proper labeling.
4. Upper Cabinet Lights: Use 16 AWG wire to connect lights under upper cabinets. Leave enough slack, as you’ll need to wire these to a switch later.
5. Red LED Accent Lights: Add red LED lights for a soothing atmosphere at night. These lights are great for ambiance and stargazing, as they don’t attract bugs. Run the wires and mark them as needed.
6. Preparing for Accessories: It’s a good idea to run an open-ended wire, ready for future accessories. This gives you flexibility for potential additions like USB chargers or additional lighting. Label it appropriately.
7. Daisy Chaining Lights: For ceiling lights, daisy chains them for a continuous connection. This involves connecting multiple light fixtures in a series so they can all be controlled together.
8. Splitting Wires: If you forget to run a specific wire, you can split an existing wire to accommodate new needs. Use butt connectors to merge two wires into one for added flexibility.
9. Plastic Conduit: To tidy up your wiring and ensure it’s protected, consider using plastic conduit. This keeps things organized and shields your wires from potential damage.
10. Safety First: Check each wire for shorts or damage. Be cautious when attaching walls, ensuring that you don’t accidentally puncture any wires.
In this tutorial, we’ve covered the basics of running wires in your van conversion. More advanced topics to explore include crimping, wire stripping, and connecting your electrical system to a battery bank. Additionally, as you attach your walls, keep your wiring organized and protected.
Stay tuned for further guides on your van conversion journey, and don’t forget to sign up for our Van Conversion Master Class. Good luck with your project, and stay safe!
Mastering Electrical Wiring, Cable Sizing, and Fuse Selection for Your Van Conversion
Van conversion is an exciting adventure, but it comes with a unique set of challenges. One of this endeavor’s most critical aspects is understanding your van’s electrical system. Choosing the right cables, determining cable sizes, and making informed decisions about fuses can be daunting for DIY van converters. In this comprehensive guide, we’ll explore these essential components to help you navigate the complexities of van conversion electrical systems.

The Importance of Cable Selection
Choosing cables for your van’s electrical system is a fundamental decision. While it might be tempting to use standard household wiring, it’s crucial to understand that these cables are not suitable for the demands of a van.

Household wiring typically consists of solid copper-core cables encased in PVC, designed for stationary use in homes. Conversely, Vans are constantly on the move, experiencing vibrations, bumps, and rough terrains. Solid-core cables are prone to “work hardening,” which can lead to eventual breakage due to these conditions.
This can result in a power failure, a situation no one wants to encounter. Therefore, it’s essential to opt for flexible cables with rubber sheathing. These cables are specifically designed to withstand the challenges of van life, with multiple strands that enhance durability and flexibility. Consider options such as “Arctic Blue” cables, which offer an extended temperature range, a valuable feature for outdoor use and van life.
Cable Protection: A Critical Consideration
Protecting your cables is just as important as choosing the right ones. Pulling cables through your van’s metal structure can expose them to sharp edges that may cause wear and damage.
To mitigate this risk, consider using PVC conduits. These cost-effective conduits are easy to install and provide additional protection. They also offer future flexibility, enabling the replacement or addition of cables as needed. Moreover, PVC coil can be wrapped around existing cables, offering extra protection for pre-installed setups.

Circuit Design and Sizing: Key to Success
Mastering circuit design is essential when setting up the electrical systems in your van. A well-structured electrical system is the key to ensuring the seamless operation of various components, such as lighting, appliances, USB sockets, solar panels, batteries, and more.
Proper Wiring of Circuits
Establishing a parallel connection is crucial when wiring multiple lights within your van. This ensures uniform voltage distribution and brightness across all lights. To achieve this, consolidate all negative connections and link them to the common negative on the blade fuse holder. Simultaneously, connect all positive connections to available slots on the fuse holder.
For calculating fuse sizes, utilize the formula: Total load = sum of power consumption (in watts) divided by voltage (12 volts). A safety margin, typically around 25%, is advisable to determine the correct fuse size. Ensure the cable size exceeds the fuse rating, guarding against cable damage.
Wiring USB Sockets and Appliances
For USB sockets and appliances, the parallel wiring method remains applicable. Consider the potential load on each socket and employ the same formula to determine the appropriate fuse size. The total load of all devices serves as the guiding factor for battery cable sizing to accommodate simultaneous operation.
Dealing with Motorized Appliances
Devices such as fridges and fans, which feature electric motors, warrant special attention. It is imperative to consult the manufacturer’s recommendations, as these devices may exhibit a higher fuse rating due to the initial surge in current when the motor starts.
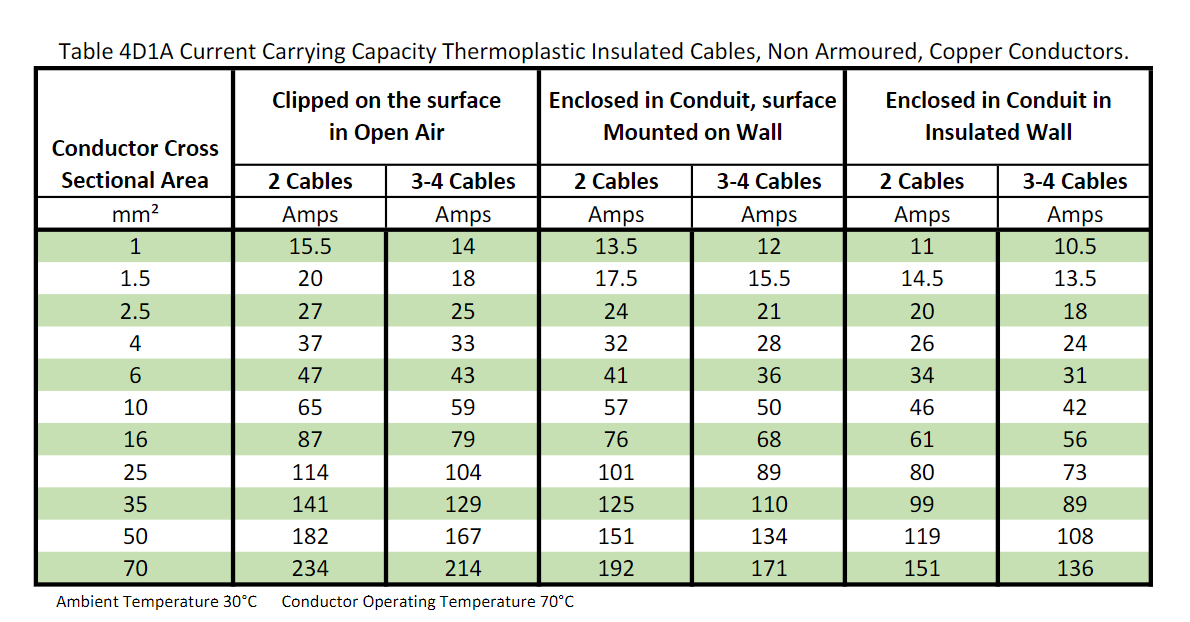
Cable Sizing and Safety
Consult the British standard cable sizing chart, considering the installation context (surface, conduit, or buried), to ascertain the correct cable size for your specific setup. When in doubt, err on caution by selecting cables larger than the calculated minimum. This mitigates the risk of overheating and potential fire hazards.
LINKS TO THE RESOURCES
Download your FREE wiring diagrams and parts list here:- Full Van Build Parts List – https://www.dropbox.com/s/zvtyj0z7cde… BS7671 Cable Sizing Chart – https://www.dropbox.com/s/5lf55srgelp… Wiring Diagrams for different types of off-grid van systems are here:- The final wiring diagram is on this link: https://www.dropbox.com/s/meaa9brw2hx…
1 solar panel, MPPT charge controller, 1 leisure battery and inverter. https://www.dropbox.com/s/1f5plerswoz… 1 solar panel, MPPT charge controller, 1 leisure battery and inverter.
https://www.dropbox.com/s/evzci35h8et… 2 solar panels, MPPT charge controller, 2 leisure batteries and inverter. https://www.dropbox.com/s/h5yfuf090hg… 3 solar panels, MPPT charge controller, 3 leisure batteries and inverter. https://www.dropbox.com/s/92ubo6d6k9m…
In Conclusion
Converting a van into a comfortable living space is an exhilarating journey marked by numerous challenges. Yet, none are as crucial to the safety and reliability of your van conversion as the proper selection of cables, sizing of these cables, and selecting appropriate fuses. Armed with the insights provided in this guide, you can approach your van conversion project with enhanced confidence, ensuring that your electrical systems are functional and safe for your journeys on the open road. Should you have further questions or require assistance, do not hesitate to contact the welcoming van conversion community for support. Happy converting!
Test the system
Once the system is wired, it’s important to test it to ensure it works properly. Connect a few appliances or devices and turn them on. If everything is working correctly, you’re ready to go!
Here are some additional tips for wiring your van’s electrical system:
- Use a fuse box to protect your electrical system from overloads and short circuits.
- Install a battery monitor to track the state of your batteries.
- Use a solar panel charger to keep your batteries charged while driving or parked in the sun.
- Use a shore power inlet to plug into a campground or other external power source.
Frequently Asked Questions (FAQs)
As you delve into the van conversion world and tackle electrical wiring, cable sizing, and fuse selection, it’s natural to have questions. Here are some of the most common inquiries and their answers to guide you on your journey:
1. Can I use household wiring in my van conversion?
No, it’s not recommended. Household wiring with solid copper cores is not suitable for the vibrations and movements experienced in a van. Flexible, multi-stranded cables with durable rubber sheathing are a safer choice.
2. How can I protect my cables from wear and tear in the van?
Use PVC conduits to shield your cables from sharp edges and potential damage. It’s a cost-effective solution that adds a layer of protection and allows for future cable additions.
3. What’s the difference between wiring lights in series and parallel?
Wiring lights in series can result in unequal brightness due to voltage drop, while wiring lights in parallel ensures uniform brightness. To achieve parallel wiring, connect the negatives to the common negative on a fuse holder and the positives to available fuse slots.
4. How do I calculate the right fuse size for my electrical circuit?
Use the formula: Total load (in watts) = sum of power consumption (in watts) divided by voltage (12 volts). Add a safety margin, typically around 25%, for the fuse size. Ensure that the cable size can handle more current than the fuse rating to prevent cable damage.
5. Should I use larger cables for added safety?
Using slightly larger cables than the minimum requirement is a prudent choice for added safety. It reduces the risk of overheating and potential fire hazards.
6. What if I have appliances with electric motors in my van, such as a fridge or fan?
Devices with electric motors may experience a higher initial surge in current when starting. Refer to the manufacturer’s recommendations for the recommended fuse rating to account for this surge.
7. Where can I find additional resources and support for my van conversion project?
You can tap into the vast knowledge of the van conversion community through social media groups, forums, and blogs. Attend van conversion events and workshops to gain practical experience and connect with like-minded individuals. Explore van conversion playlists, downloadable resources, books, and guides for further assistance.
8. Are there specific electrical regulations I should know in different locations?
Yes, electrical regulations can vary by location. If you’re converting your van in one region but planning to use it in another, be sure to understand and comply with the local electrical wiring regulations and standards.
9. Is van conversion just about altering a vehicle, or is it a lifestyle transformation?
Van conversion encompasses both vehicle modification and lifestyle transformation. It’s an opportunity to create a mobile home that offers freedom and self-sufficiency, whether for weekend getaways or full-time van life.
10. Any final words of advice for van converters?
Embrace the challenges of van conversion as a journey, not just a destination. Stay curious, keep learning, and enjoy the process. The skills you acquire and the connections you make within the van conversion community will enhance your van life experience.
Remember, as you embark on your van conversion project, questions are natural, and the van conversion community is a supportive resource. Happy converting, and may your van life adventures be filled with freedom and excitement!